Favorites Videos
Articles
Tops Pricing  
Sign in Register for free!
Sign in Register
CLOSE


Soft Powder Brows (Eurpean vs American)

Oct 25, 2023, Update: Oct 25, 2023, author: Powderbrows.com / Holistic PMU
Share this article
2

"Crafting the perfect Soft Powder Brows demands precision and expertise at every process step. This article delves into the key differences between classic "American" Ombré brows and Soft Powder Brows. We'll also explore essential factors like needle selection, hand movement, and machine settings and offer practical tips for achieving "perfect pixels"."

1. Background


We often receive a wide range of questions, but one of the most frequent topics is how to improve the quality of Soft Powder Brows. To provide useful tips for elevating your Soft Powder Brows game, we consulted 22 PMU artists experienced in various brow styles, including Soft Powder Brows. All participating artists have at least four years of experience in creating Powder Brows, making it a primary service for their client base. Most shifted to the Soft Powder Brows style between 2020 and 2022 and believe it holds significant future potential. The research participants come from diverse regions: 16 are from EU countries, three are from the UK, and three are from the US. While their techniques may vary slightly, most of their advice is universally applicable.

2. Soft Powder Brows vs. Classic Ombré


First, let's clarify the differences between these two approaches. While the distinctions may not be major, they are certainly noticeable. The "Classic Ombré" approach often aligns more with the American creation of Powder Brows. Key differences revolve around the shape of the arches, the height of the apex of the upper arch, and the prominence of the upper arch line.

Understanding Arch Shapes

The shape of the brow should naturally complement facial features, and there are various methods for accurately mapping out brows. Regarding shape and placement, many aspects are relatively fixed within a small margin. For instance, it's difficult to move the starting line of the brows drastically or to choose fundamentally different methods for determining their length. Regardless of the mapping method used, it will generally follow the natural contours dictated by the human skull, orbital bones, eye sockets, and the distance between the eyes.

However, one aspect that does allow for stylistic variation is the lower arch. In the more classic Powder Brows or the American-style Ombré brows, the arches often display a more noticeable curvature rather than being straight. For instance, the higher arch, which extends from the starting point to the highest point of the brow, may even curve slightly downward rather than remaining straight. In contrast, Soft Powder Brows tend to have straighter lines shaping the arches.

Subtle Differences in the Height of the Apex

On the right: American flag, a black woman's eyebrow with defined outlines, and an attractive woman on the right.

In Soft Powder Brows, compared to the "American Style Ombré Brows," the apex of the upper arch tends to be positioned lower. This is due to the lower arch's more linear shape and the resultant slightly increased brow thickness. While the horizontal location of the highest point of the upper arch can be mapped from the brow's start, the artist usually determines the vertical height. The somewhat thicker structure of Soft Powder Brows doesn't permit the highest point to be raised as high as in the relatively "slimmer" form of the Classic Ombré Powder Brows.

Softer Upper Arch

Another noteworthy difference between the "American Classic Ombré" style and Soft Powder Brows relates to the upper arch's "softness." While both styles use a shaded ombré filling technique, the upper section of Soft Powder Brows tends to be less sharply defined. It fades away without a clearly marked upper arch. In contrast, the Classic and more "American" Ombré brows have a well-defined upper arch, particularly closer to the brow's head. As for the "head" section of the brows in both styles typically feature a shaded, "ombré" look rather than a solid, dark head, which has become increasingly uncommon in modern Powder Brows.

However, that approach is not absolute. Some seasoned artists in Europe and the US share this opinion, whereas some say that when it comes to the shape of the upper arch and the brow "slimming," it should always depend on the concrete facial features of the client. They admit that the brow that has a more shaded upper part can be drawn larger still when it comes to the height of the apex of the upper arch; they stress that this is a function of a myriad of factors and by no means should one risk making it too high, because that can change the facial expression to overly dramatic.

3. Artist's Focus on Pixels Explained


Why Artists Care About Pixels

For many artists, the ultimate goal in crafting top-notch Soft Powder Brows is to achieve a "pixelated" effect. Interestingly, the significance of pixelation appears to be somewhat artist-centric. Various studies by the PowderBrows.com Research Center reveal that surprisingly few clients share this focus on pixelation. In a survey involving 461 Powder Brows customers, only 22% reported being "more satisfied" when they noticed a clear pixelated look in their brows post-procedure. Thus, it seems that the desire for a pixelated outcome is often more crucial for the artist than for the client.

Pixelation Fades Over Time

Another factor to consider is that pixelation, characterized by small, round dots, tends to fade during the healing phase. The fresh pigment that is visible immediately after the procedure resides in the skin's epidermis layer. As this outer layer sloughs off over approximately four weeks, the pigment within the dermis layer remains. In most skin types and pigmentation approaches, the pixelated appearance in the dermis becomes less distinct, and the sharp edges of the pixels often blur.

The True Importance of Pixels

However, this doesn't mean pixels are unimportant. In fact, quite the opposite is true. Even if the pixels aren't always visible, their quality can still indicate the overall quality of the Soft Powder Brows pigmentation. If the pixels appear small, round, and sharply defined, it suggests a range of best practices have been followed. These include the correct depth and angle of pigmentation and the absence of blowouts and migration. So, although the pixelation may fade due to factors beyond the artist's control—such as skin oiliness or how diligently the client follows aftercare guidelines—well-defined pixels still serve as a quality marker for the work performed.

4. Preparation for procedure


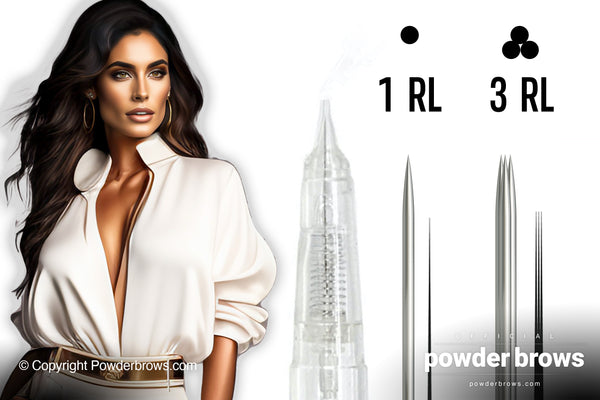
An attractive woman on the left, a PMU machine needle cartridge in the middle, and a 1RL needle and 3 RL needle on the right.

Opt for a Single Round Liner (1RL) Needle

The universal favorite for creating pixelation is undoubtedly a round liner needle, commonly called 1RL. The artists we consulted almost unanimously chose this needle when striving for that pixelated effect in Soft Powder Brows. Some used 3RL needles for covering the brow, but when it comes to pixels, 1RL is preferable. Any other needle size reduces precision, particularly when filling the brow area with pixels. A surprising advantage of using a single needle is that it often administers the largest amount of pigment into the skin. So, a 1RL needle is precise and highly effective in pigment deposit. Moreover, using a single needle means you can ease up on the pressure applied to the machine and lessen the need for skin stretching.

Match Needle Diameter to Skin Thickness and Pigment Characteristics

Understanding needle cartridge labels is essential for optimal results. The number following the formation definition indicates the actual diameter of the needle. These measurements generally range from 0.16 to 0.4 mm. While one might initially assume that a smaller "nano" needle would provide the greatest precision, that's not always the case. Selecting the appropriate needle diameter should be considered, not made in isolation.

Ensuring Pigment Penetrates the Pixel

For clients with mature or delicate skin, which is often thin and fragile, many experienced artists recommend using a finer needle for optimal pixelation. Moreover, your needle choice should align with the type of pigment you're using. Most artists these days opt for hybrid pigments, which contain both inorganic and "organic" elements—though it's important to note that the organic component here isn't truly organic hydrocarbons but rather elemental carbon. These pigments typically have a molecular size ranging from 100 to 250 nm but also contain larger mineral components like iron oxides.

Practically speaking, implanting the pigment into the skin is more challenging than with hydrocarbons with larger molecular sizes. Hence, the needle used must be capable of generating a wound large enough to accommodate the pigment's chemical properties. Among the artists we consulted, needles ranging from 0.25 to 0.35 mm in diameter were popular, with 0.3 mm being the most commonly chosen size for creating a pixelated appearance.

Lubrication for Easier Pigment Insertion

Many artists use skin butter as a lubricant to facilitate easier pigment administration. Dermatologically speaking, these butters help soften the skin and ease the pigment's flow into the dermal layers. Products like booster balms and butter moisturize and soften the skin, making it easier to deposit the pigment. This form of "lubrication" also allows for the use of pigments with a somewhat larger inorganic component. While some artists lean toward booster creams containing shea butter and other natural plant-based ingredients, many professionals prefer silicone-based boosters. Ultimately, the choice of lubricant largely depends on what works best for the individual artist.

Understanding Machine Stroke Height When it comes to machine stroke height, it's critical to understand that this term refers to the force with which the needle impacts the skin. To visualize this, imagine dropping a metal ball from a second-floor balcony versus a third-floor balcony onto grassy soil. The first ball will make a smaller dent than the second, which parallels the difference between machines with medium and long strokes.

Stroke height is generally measured in millimeters (mm). However, what's considered a "medium stroke" versus a "long stroke" can differ between machine manufacturers and industry professionals. A medium stroke usually falls within 2.0 to 3.0 mm as a general guide. Some brands even extend this to 3.5 mm and still label their machines as having a "medium stroke." On the other hand, a long stroke typically ranges from 3.1 mm to 4.0 mm and sometimes even 4.5 mm.

Medium vs. Long Stroke: What Works Best?

There's no hard-and-fast rule stating that either a medium or long stroke will definitively produce better pixels. Most seasoned artists agree that the choice largely depends on the artist's preferences and techniques. For instance, some artists with a lighter touch prefer to build multiple layers; using a long stroke could cause excessive skin damage. Conversely, many professionals find that a long stroke - around 3.0 or even 3.5 mm - yields pixels with better retention.

This is universally agreed upon: if you're a beginner, starting with a machine featuring a medium stroke is safer. While long strokes have the potential to create well-defined, longer-lasting pixels, they should only be used by experienced artists. In the hands of a novice, a long-stroke machine risks causing blowouts, uneven pixels, skin tearing, and, most critically, excessive skin trauma from needle penetration that's too deep.

5. Procedure suggestions


Mastering Delicacy in Stroke

Many experienced artists shared that they've become proficient in using both medium and long strokes over time. For instance, a medium stroke of around 2.5 mm remains viable, especially when working on mature or thin, fragile skin. The key factor here is developing a "feel" for the skin. If an artist is still learning to control hand movements, applying any extra pressure while using a powerful 3.5 mm stroke can result in significant skin damage.

Optimizing Hand Movement Speed

For Soft Powder Brows, nearly all artists concurred that slower hand movement yields longer-lasting, well-defined pixels. This doesn't only apply to the movement of the artist's hand but also to the speed of the machine. It's logical that if you only slow down your hand movement while keeping the machine speed the same, you'll create a line, not pixels. Even though many seasoned artists find it challenging to adapt to slower hand movements, it's a skill that can almost always be acquired with practice.

Moreover, artists generally agreed that quicker, shorter movements, especially when using a "pendulum" technique, resulted in a softer, powdery finish. For a truly pixelated look, using a pendulum technique is rare. Instead, most artists prefer to whip the needle toward themselves. This whipping action generally starts almost horizontally and gradually shifts to a more diagonal angle as the brow takes shape, moving from the tail towards the head.

6. Cleanliness and Precision


Keep Needle and Skin Clean

Ensuring a clean needle, skin, and workspace is vital for pixel quality. One way to avoid smudging is to have the correct "needle hang," which refers to how far the needle protrudes from the cartridge. If the machine's stroke height and the cartridge design aren't compatible, you may encounter two issues. Either the needle doesn't retract enough inside the cartridge to pick up sufficient pigment, or it doesn't extend far enough, leading to skin smudging.

Achieve the Correct 'Hang'

Artists generally recommend a needle "hang" of at least 2 mm. While some might argue for precise measurements down to 0.5 mm, most experienced artists find this unnecessary. The practical difference between a 2.25 mm and a 2.5 mm "hang" is negligible for them. The real issue is often having a hang that's too short.

Routine Needle Cleaning

Cleaning the needle regularly is crucial. Many artists keep a cup of water nearby for this purpose. To clean the needle, submerge it in the water and then tap it vertically on a cotton swab or gauze. Ensure the needle doesn't touch the bottom of the cup, as this can make it blunt.

Optimizing Visibility

Another key factor is the artist's visibility of the area being pigmented. It helps to position your fingers so that you can clearly see the needle and make contact with the skin. Wipe away any lymph, blood, or pigment obstructing your view.

Lighting Matters

Lighting is also critical. In fact, you can't really have too much light. Some artists we consulted use headlamps to better focus on the area. While they didn't use the magnification features that many lamp systems offer, they often invested in high-quality LED headlamps. Unlike cheaper alternatives that claim to be for pigmentation, many professionals opt for powerful lamps designed for problem-solving in low-light conditions or for medical procedures.

7. Conclusions


Soft Powder Brows typically have a thicker shape and less curved upper and lower arches than the classic "American" style ombré brows. Additionally, they don't have a defined outer border at the top of the brow.

The focus on achieving a pixelated look is not merely about aesthetics; it's a mark of quality, especially in Soft Powder Brows. A well-executed pixelated look right after the procedure often indicates that the final result will heal beautifully. Hence, artists' "obsession" with pixels is not just for show but a genuine measure of work quality.

In terms of technique, experienced artists often opt for 1RL needles with a 0.3 mm diameter and machines with a long stroke height of 3.5 mm. However, stroke height preference can vary. Some professionals prefer 2.5 mm stroke height machines and apply more layers. The consensus is that long strokes should only be used by those with ample experience.

Regarding materials, most artists use hybrid pigments containing both mineral elements and elemental carbon to create perfect pixels. Achieving a pixelated look with very liquid pigments and hydrocarbons is generally deemed difficult. To facilitate pigment application, artists often use skin butter and boosters. The choice between shea butter-based and silicone-based boosters is usually individual and dependent on both the artist's approach and the type of pigment used.

Finally, slower hand movements and reduced machine speed produce better pixels. The "whipping" movement is often used, allowing the artist to see the needle entering the skin clearly. Consistent needle cleaning and adequate lighting, often achieved with a high-quality, medical-grade headlamp, are also considered best practices.
 
  Readers suggest
Samples of Powder Brows 
 
How to create perfect pixels? 
 
Basics of creating pixels to powder brows 
 
Find this interesting?
or
 
Comments
 
Larissa
Friday, Nov 03, 2023

Absolutely great article and I love the site. I have been reading it for 2 days now. I also joined and I can not get enough! Very clear and professional information indeed! Great site!

Agnieszka
Wednesday, Oct 25, 2023

Very well explained all topics. Very useful information. I will join next week. I sent email too, when you can, please reply to me!
Agnieszka


Want to learn Powder Brows?
Your name*
E-mail*


Powderbrows.com LLC serves as the premier resource for material related to Powder Brows, Microblading, and the business of brow services. For collaboration opportunities, contact us here
Powderbrows.com partner in Scandinavia: Brows.fi
Holistic PMU
Powderbrows.com
Hairstrokes.com
Lipblush.com
Combobrows.com
Everyoung.com


Company
About us
Contact us!
Terms of Service
Privacy Policy
User
Account
Log In
Register
Upgrade!
© 2024. Powderbrows.com LLC. 225 Park Avenue, NY, NY, 10003, USA. All rights reserved. Terms of Service and Privacy Policy   |    Sitemap
Do you want a similar private portal platform? Contact developer: stprivatdevserv@gmail.com